Tuesday, April 16, 2019

Back in the Saddle

It's been a while since I've posted about sewing projects.  That doesn't mean I haven't been sewing, I have.  Starting in 2016, I started attending Costume College, its an amazing event put on every year by the Costumers Guild West. During the day there are classes in pretty much all aspects of costuming and in the evening costumed events. It definitely feeds my costuming soul since I stopped going to  the SoCal Renaissance Faire. After 40+ years of attending, I just couldn't do it any more. It has become "Ye Olde Renaissance Swap Meet and Food Truck Con" I just found myself depressed attending so that was it for me. Another event that feeds my little costuming soul is Dapper Day, an event at Disneyland and other various sites in the LA area.  Dapper Day is what I thought I would post about today to get back into blogging.

Three years ago I wrote about loss, we had a heart wrenching year with the loss of several family members. To find balance and cheer, John and I started going on outings together, basically dating each other now that we were empty nesters. Since John works in education he usually has Friday off, this was the start of "Fridates".  One of these Fridates we went to my happy place, the Downtown LA garment district. It was there that I found an amazing silk/cotton fabric. It was white printed with pink flowers, it was vibrant, happy, and just spoke to me. I wasn't sure what the fabric would become but I knew it had to be vintage inspired and that I would have to honor the fabric by using couture techniques to make it.


Fast forward 3 years to now and I pull the fabric out of my stash. Two years ago, John and I attended our very first Dapper Day at Disneyland.  I made my dress and altered a seersucker jacket that belonged to John's Dad along with some white linen pants for John and a brand new obsession was born.


For this year's spring outing, John requested we dapper Disneybound as characters, but which ones?  John chose Pooh and Piglet, for him, we found a Pooh Bear colored suit in LA, paired it with a red shirt, a hunny colored tie, pocket square, a hat, and he was good to go.  I, however take a little more planning. so I pull the 6 yards of silk/cotton out of my stash and get to thinking.  I decide I need a full skirt and it just needs to say springtime! I also started thinking about accessories, because sometimes they make or break an entire look.  I wanted to be thoughtful about it.

I found this pattern in my stash, then began the process of grading up the pattern to fit my more, shall we say, voluptuous shape?
              

I used only the bodice pattern for the dress, I had previously graded up the skirt from another pattern and decided to use that.  Once I had traced this bodice, adjusted the size, I was ready to cut my first muslin of the bodice. 


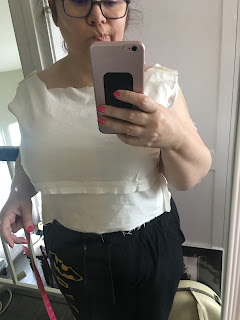
pattern check number 1

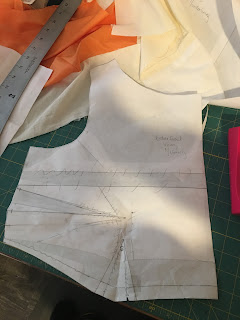
As you can see, the midriff seam is too high, a full bust adjustment was needed.

Messy but done.

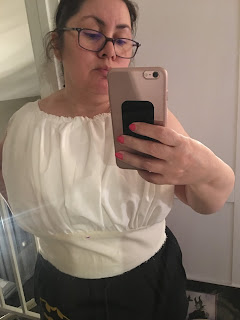
Success!!! This is the 4th muslin I made and I added the gathered bodice piece to check the look. 
Time to cut my silk.

I underlined the fashion fabric with silk organza to give it a floaty quality. This was hand sewn to all the pieces. It gives the silk fabric a rounder shape which is noticeable in the skirt.

              
Once I got the bodice put together and the skirt put together I gathered it and basted it to the bodice while waiting for the hubby at Kaiser. I noticed an outlet and thought to myself that I should have brought my sewing machine. 

                 
I ended up removing the skirt because of a small fit issue with the bodice.  It needed a stabilizer piece that I made from the organza.  Also it was a little too poufy, my daughter said it looked like I was trying to sneak snacks in my bodice.  


Finally got the skirt and the zipper in, then onto the lining!

Once I got the lining put in and the hem done, I did a final try on and discovered another issue.  The back neck was gaping. Ugh. So I explained to John how to pin the excess so I could look at it and decide the best course of action after I had a good cry.  While helping me John snuck a selfie in. 😂


Mostly done, but the back neck issue still needs to be solved, hence my unhappy face. The solution turned out to be 3 inch darts in the back neck. which meant unpicking about 5 inches of the back neck, adding the darts and sewing it back together, joy.

 Lining neck dart
Outside back neck dart

And finally my label!

Last but not least, my accessories. I purchased a plain paper parasol from Hobby Lobby in pink for $7.99, originally I was going to buy a yellow one and paint it to look like the hunny pot but decided it wouldn't look right, so I went with the pink.  And drew on it freehand, first in pencil then with permanent marker. I used a stencil for the lettering.


I purchased a vintage pink hat from an Etsy seller and also made a hair flower to wear under the hat brim, my pinks didn't quite match up so at the Dapper Day Expo I bought a white double lily hair flower from La Casa De Flores that was perfect!


And finally, the piece that I considered for a while, had my doubts about and ended up being the most popular part of my outfit, my purse.  I found a vintage 1970's wicker purse in the perfect shape and decorated it to look like Pooh's Hunny Pot, my friend Heather cut the vinyl lettering for me.  I found a little happy bee to hang on the zipper pull and I was ready to go!


Overall, our trip to Dapper Day was perfect! We met up with some friends, it was their first time attending and had lunch with them. The parks weren't as crowded as you would expect, and the weather was perfect! What more could I ask for? 

This picture cracks me up because of the reflections on my glasses and the Mickey sign looks like it's attached to John's hat. I also get asked about shoes, I'm known for my shoes by most friends, for Dapper Day I go practical, I'm wearing a pair of Rockport MaryJanes that are comfy and have great support. If it's one thing I've learned, it's always take care of your feet!

Selfies while waiting for lunch, After I took this photo I discovered that my bodice lining is riding up, this can probably be solved with a small weight attached to the lining.

Oh, and did I mention I met Gertie Hersch? She is beautiful, inside and out! 

Easy Dinner

As a member of The Church of Jesus Christ of Latter Day Saints, we are very much into service. We believe that by serving our fellow man or woman we are in the service of our God.  A form of service I love is feeding our church Missionaries, young men and women in our church volunteer their lives to this, for the young men it’s a period of 2 years, and for the young women it’s 18 months. They serve all over the world, they learn the culture and language where they serve, make life long friends, and lives are changed. They return changed as well, how do I know? Because 2 young men changed my life in 1991 and also we have had 3 sons serve missions and currently our youngest is serving his mission in Argentina. It truly is a special experience to be a part of. I love feeding the Missionaries in our church, whether they are young men or women, they bring a special spirit into our house.
Our youngest son, holding the sign, serving his mission in Argentina

P-Day (or preparation day) in Argentina. This is the day they can grocery shop, explore the area they are serving in, do laundry, write letters home. 

A few years ago 2 of the Elders we were feeding told our bishop that I was the best cook in our ward (congregation), I thought that was hysterical because I’m not a great cook. I have a sign in my kitchen that says, I know how to cook, I just don’t. I like to think of myself as brilliantly lazy. Here’s my secret for anytime I have people over, develop a few easy but really good recipes and stick to them. I have a few, and since the Missionaries tend to rotate in and out I can get away with never serving them the same meal twice. I can do an excellent pot roast, enchiladas, we do a Swiss dish called raclette, lasagna, and finally tonight’s meal, sweet pork. 

For this meal, I purchased a pork shoulder and cooked it in the crock pot overnight on low, fat side up. The only spice on it was garlic powder. Then this morning all I did was remove the fat, drain the liquid and shred the meat. To this I mixed 1 cup each brown sugar, ketchup, and Mexican Coke. Regular coke works fine too. Poured this over the meat and continued to cook on low for at least 4 hours. With this I will be serving black beans, corn, and cilantro lime rice.


For the beans, I  add a can of Rotel tomatoes with chilies. Drain the beans, add the tomatoes and heat. The corn is just frozen corn. If you can make white rice you can make cilantro lime rice. 1 cup rice, 2 cups water, the juice of 2 limes. 1 bunch chopped cilantro, 1 eyeball the amount of cilantro so whatever looks good to you, 1 tbs olive oil. I will usually add the lime pieces in while the rice is cooking too and remove them before serving. Bring all the ingredients to a boil, reduce heat, cover and simmer for 20 minutes. Garnish with extra cilantro.


 The best part of this meal is what my family calls Crack Dressing. Again it’s easy because I am nothing but lazy. Also it’s fattening so I don’t make it often. I mix 1 cup buttermilk with 1 cup mayonnaise, the juice of 2 limes, ranch dressing mix, 1 bunch cilantro, and 1 1/4 cup Herdez salsa verde. This all goes in the blender and is given a good whirl. I make this a day ahead and refrigerate it over night. It’s really really good.


With this I serve my secret family recipe salsa, sorry I have to have given birth to you to give you the recipe, guacamole, our local grocery store sells a ready made that’s pretty good, sour cream, and tortillas, flour or corn whichever you prefer. 

For dessert again I went easy with a crockpot dump cake, canned peaches , yellow cake mix, and butter. Recipes can be found all over the Internet especially on Pinterest.
                                             

The best part? It’s so easy and I have satisfied dinner guests afterwards, and what can be better than that? 

Cheers,
Terri

Monday, October 17, 2016

I Want Candy!!!

It occurred to me as I uploaded my last blog post that I never posted a how-to on my Marie Antoinette inspired shoes.  I also noticed that my pin with the pictures showing the before and after on Pinterest has been repinned many many times so I guess I should post a tutorial. I did these shoes almost 10 years ago so here goes nothing.


Items needed 
Pair of shoes preferably with a court heal
Fabric about 1 yard I used a scrap of Pink Moire Taffeta
Trim I used Soutache Braid
Modge Podge
Hot Glue Gun
Binder or Wonder Clips
An old butter knife
Exacto knife
Sponge brush
E-6000 glue
A piece of card stock or heavy leather
Ribbon
Buttons or Earrings 
Patience lots of patience


The first thing I did was run the Exacto knife around the shoe where the top of the shoe meets the sole to loosen the glue.  Next you will need to cut fabric to cover the front of the shoe if you are using a shoe that doesn't have breaks like mine, you will need to make sure the fabric will stretch around the entire shoe and meet in the back of the heel. The fabric will need to be cut on the bias to allow it to stretch and be manipulated. Start by coating the shoe with the Modge Podge starting at the toe and working back, go slowly, in sections. Be careful, work the fabric around until there are no bubbles.

When you are happy with the placement of the fabric, trim the fabric so you have 1/4 inch or less on the edges, using the butter knife tuck the fabric into the shoe where you loosened the sole earlier. Run a thin bead of the E-6000 glue around the bottom to glue the sole back to the upper part of the shoe.
 I didn't bother to tucking the fabric at the heel or loosening the glue because I knew I was going to add trim.
Next cover the heel and trim the fabric close especially at the bottom.

You don't need to do this step, you can just start decorating from here adding trim and ribbons.  I don't have any photos of the next part but I measured across the vamp and cut a piece of heavy card stock, actually if memory serves I may have doubled or tripled the pieces of card stock, if you have a sturdy piece of shoe leather it can be used instead. Next I covered the cardstock with more fabric leaving an extra 1/2 in strip at the bottom to glue onto the shoe I added trim to the piece so I wouldn't have to fiddle with it once I glued it to the shoe. Using the E-6000 to glue it and also my hot glue gun to hold it in place. To my surprise it held! If you have binder clips or wonder clips, you can use those to hold the piece until the glue dries. 


The bottom of the card stock piece has the extra flap of fabric glued down. I then used more Soutache braid to hold the bottom down, again the combination of hot glue and E-6000. 

 After it dried, came the fun part, adding trim and decorating! Let your imagination go wild! 
I wanted mine to look like a decadent birthday cake.

The more trim and decorations the happier these shoes made me!

Again let your imagination run wild, remember this is the era of Marie Antoinette and
 Madam du Berry so don't hold back. 

So that's it! I have had these shoes for almost 10 years now and wore them to Pirate Day at the Renaissance Faire at the Santa Fe Dam in Irwindale and they held up and are still good to go.  I know this look isn't anywhere near Renaissance but there is a story behind it.  Not bad for a project I came up with two days before the Faire after watching Sofia Coppola's "Marie Antoinette" a few too many times. 

 The total look, you can find a tutorial for the tricorn hat here

 A bit of whimsey, I thought these green stockings were perfect with all the pink. 
This is probably one of my favorite costumes ever and most of it happened by accident. 


Crazy or Awesome You Decide

This has been a difficult year for my family, with all that has gone on I felt like I had lost my sew-jo.  In July I felt some inkling of it returning after attending Costume College for the first time. It was amazing!!! Then in August, my wonderful hubby treated me to a trip to New York City! He tailored the trip around everything I love, fabric, museums, shopping, vintage fashion, and food! Our first full day there he booked a private tour with a company called Seek NYC that gives tours of the Garment District.  Liz, our guide is an industry insider and took me to all her favorite shops, it was like Candyland but with fabric.  I purchased 6 yards each of two different silk fabrics for a future Regency costume I've had in my brain for a while.  I also purchased two pashmina shawls for the costume and a very pretty Lucite clutch purse to use with my vintage dresses.

Last Wednesday I was on Pinterest and came across a pin that someone had posted using a place mat as a bergere hat for a 1700's costume.  I have wanted one of these for ages and decided I would try it, but the link for the hat left me disappointed because to me it still looked like a place mat with flowers attached. The next morning I awoke with my crazy/awesome idea. I did a little bit of research on Pinterest looking at bergere hats also I headed over to this blog and studied the lovely photos and her explanations.  The Dreamstress is a wonderfully talented costumer.  My next trip was to Target where I purchased 4 round, woven place mats for $1.99 each.

So onto my crazy/awesome idea, I'll try to explain what I did.

Items used
Place Mats
Spray Starch
Old Towel
Hair Dryer
Small Saucepan
Lid from my Button Jar
Iron
1/4" Elastic
Straight pins


I found red and black at my local Target  since this was an experiment I wasn't too fussed about color so I decided that black and red would be fun, I had no idea how appropriate these would be until Friday.

To start, I soaked the place mat in hot water, then draped it over the inverted saucepan.  Using my hands and the hair dryer I shaped the place mat over the the sauce pan to create a crown, pushing down and shaping as I went.

You can see a form of the crown taking shape but it wasn't as sharp as I was hoping for, so after trying this for 15 minutes I decided to try something else.  I'm an impatient costumer so if I don't get immediate results I sometimes move on to another project. But I decided to stick with it. 


Next I got the lid from my button jar, it's one of those jars you find at Marshalls or Home Goods that any number of people have on their kitchen counter. The one I have looks a little like this but slightly larger.
It's about six inches in diameter and shallow, just what I needed. 

I placed it on my ironing board and centered the place mat over it. I then pinned it in place to keep the brim flat and tied 1/4" elastic around the area I wanted for the crown. Side note: pin the elastic in place, it won't stay on its own and you will just grow frustrated. I tried a rubber-band first but only succeeded in shooting myself in the forehead, so save yourself the trouble and pin down the elastic.

 Here it's shown on the black place mat I did later, I accidentally deleted the photo of the elastic on the red place mat. 

Next, using a spray bottle, I sprayed the place mat again with hot water. I heated my iron to the hottest steam setting and sprayed the crown area with spray starch.  I don't know if the starch makes a difference but I figured it couldn't hurt. 

Using the iron and a muslin press cloth I started steaming the straw over the lid to form the crown.  I used the press cloth to protect the sole plate on my iron in case the dye on the place mat wasn't set, the last thing I wanted was a dirty sole plate so better safe than sorry. 
I did this for about 30 minutes then used my hair dryer again to dry the straw as much as possible. Next came the hardest part, I walked away from it and let it sit for a few hours while I worked on another project, in another room, downstairs as far as possible from this.  I knew if I stayed in the room I would keep fussing with it so I walked away. 

When I returned the first thing I did was remove the elastic to see if the shape would hold. 
 So far so good! Finally I removed all the pins, another side note: as a precaution I used glass headed pins, because of the heat from the steam I didn't want to use the plastic headed pins for fear of the heads melting.
 And success!!! I can't wait to decorate this but that will have to wait for another time. 

The black hat turned out a little droopy but that's fine.  

Friday my youngest son, Bubba and I headed to Downtown LA to go to FIDM, my purpose was two-fold, one to see the Emmy costume exhibit before it closed the following day and the other was the $1.00 a yard fabric sale at the Scholarship Store.  Unfortunately only one part was successful, the store only had knits for sale and the woven fabrics were nothing I needed but that's just how it goes sometimes.  I did get a hat for my son, a neck tie, some lapel flower pins, and a couple of bow ties. The gallery on the other hand was a complete success and I took pictures of everything! Here are two of my favorites and you'll understand why finding the black and red place mats was fortuitous.

First, the Outlander costume designed by Terry Dresbach, an 18th century look based on Christian Dior's New Look, check out the hat.
 I tried to get a better photo but I'm short and the ceiling was black but you get the idea. 
I will definitely be making a copy of this in the future!

Then there was this gem, if you're a Marvel fan you'll recognize it.
Peggy Carter from Agent Carter, again I didn't get a great photo but look at the hat!!! It was a straw hat and the edge was trimmed with fabric that matched the dress. 
This one has a wider crown than the bergere I made but that can be easily done and I do have another place mat.  Proof that inspiration for fashion can be found in any century. 

Another project I did last week was something that meant a lot to a friend, she has 2 boys and I saw this and asked if she needed something like this for them. They are for seatbelts, if Heaven forbid, she is ever in an accident and is unresponsive, it helps rescue workers know why her boys aren't speaking. My husband gifted me with an embroidery machine last year and I love putting it to use in this way. 

So that's the stuff I've been working on, hopefully in the future I will be more consistent posting things, I'm not trying to reach thousands with my blog but someday when I'm gone I hope my grandkids will see this, like it, and get to know me through it. 
Terri