Showing posts with label Costumes. Show all posts

Monday, October 17, 2016

I Want Candy!!!

It occurred to me as I uploaded my last blog post that I never posted a how-to on my Marie Antoinette inspired shoes.  I also noticed that my pin with the pictures showing the before and after on Pinterest has been repinned many many times so I guess I should post a tutorial. I did these shoes almost 10 years ago so here goes nothing.


Items needed 
Pair of shoes preferably with a court heal
Fabric about 1 yard I used a scrap of Pink Moire Taffeta
Trim I used Soutache Braid
Modge Podge
Hot Glue Gun
Binder or Wonder Clips
An old butter knife
Exacto knife
Sponge brush
E-6000 glue
A piece of card stock or heavy leather
Ribbon
Buttons or Earrings 
Patience lots of patience


The first thing I did was run the Exacto knife around the shoe where the top of the shoe meets the sole to loosen the glue.  Next you will need to cut fabric to cover the front of the shoe if you are using a shoe that doesn't have breaks like mine, you will need to make sure the fabric will stretch around the entire shoe and meet in the back of the heel. The fabric will need to be cut on the bias to allow it to stretch and be manipulated. Start by coating the shoe with the Modge Podge starting at the toe and working back, go slowly, in sections. Be careful, work the fabric around until there are no bubbles.

When you are happy with the placement of the fabric, trim the fabric so you have 1/4 inch or less on the edges, using the butter knife tuck the fabric into the shoe where you loosened the sole earlier. Run a thin bead of the E-6000 glue around the bottom to glue the sole back to the upper part of the shoe.
 I didn't bother to tucking the fabric at the heel or loosening the glue because I knew I was going to add trim.
Next cover the heel and trim the fabric close especially at the bottom.

You don't need to do this step, you can just start decorating from here adding trim and ribbons.  I don't have any photos of the next part but I measured across the vamp and cut a piece of heavy card stock, actually if memory serves I may have doubled or tripled the pieces of card stock, if you have a sturdy piece of shoe leather it can be used instead. Next I covered the cardstock with more fabric leaving an extra 1/2 in strip at the bottom to glue onto the shoe I added trim to the piece so I wouldn't have to fiddle with it once I glued it to the shoe. Using the E-6000 to glue it and also my hot glue gun to hold it in place. To my surprise it held! If you have binder clips or wonder clips, you can use those to hold the piece until the glue dries. 


The bottom of the card stock piece has the extra flap of fabric glued down. I then used more Soutache braid to hold the bottom down, again the combination of hot glue and E-6000. 

 After it dried, came the fun part, adding trim and decorating! Let your imagination go wild! 
I wanted mine to look like a decadent birthday cake.

The more trim and decorations the happier these shoes made me!

Again let your imagination run wild, remember this is the era of Marie Antoinette and
 Madam du Berry so don't hold back. 

So that's it! I have had these shoes for almost 10 years now and wore them to Pirate Day at the Renaissance Faire at the Santa Fe Dam in Irwindale and they held up and are still good to go.  I know this look isn't anywhere near Renaissance but there is a story behind it.  Not bad for a project I came up with two days before the Faire after watching Sofia Coppola's "Marie Antoinette" a few too many times. 

 The total look, you can find a tutorial for the tricorn hat here

 A bit of whimsey, I thought these green stockings were perfect with all the pink. 
This is probably one of my favorite costumes ever and most of it happened by accident. 


Crazy or Awesome You Decide

This has been a difficult year for my family, with all that has gone on I felt like I had lost my sew-jo.  In July I felt some inkling of it returning after attending Costume College for the first time. It was amazing!!! Then in August, my wonderful hubby treated me to a trip to New York City! He tailored the trip around everything I love, fabric, museums, shopping, vintage fashion, and food! Our first full day there he booked a private tour with a company called Seek NYC that gives tours of the Garment District.  Liz, our guide is an industry insider and took me to all her favorite shops, it was like Candyland but with fabric.  I purchased 6 yards each of two different silk fabrics for a future Regency costume I've had in my brain for a while.  I also purchased two pashmina shawls for the costume and a very pretty Lucite clutch purse to use with my vintage dresses.

Last Wednesday I was on Pinterest and came across a pin that someone had posted using a place mat as a bergere hat for a 1700's costume.  I have wanted one of these for ages and decided I would try it, but the link for the hat left me disappointed because to me it still looked like a place mat with flowers attached. The next morning I awoke with my crazy/awesome idea. I did a little bit of research on Pinterest looking at bergere hats also I headed over to this blog and studied the lovely photos and her explanations.  The Dreamstress is a wonderfully talented costumer.  My next trip was to Target where I purchased 4 round, woven place mats for $1.99 each.

So onto my crazy/awesome idea, I'll try to explain what I did.

Items used
Place Mats
Spray Starch
Old Towel
Hair Dryer
Small Saucepan
Lid from my Button Jar
Iron
1/4" Elastic
Straight pins


I found red and black at my local Target  since this was an experiment I wasn't too fussed about color so I decided that black and red would be fun, I had no idea how appropriate these would be until Friday.

To start, I soaked the place mat in hot water, then draped it over the inverted saucepan.  Using my hands and the hair dryer I shaped the place mat over the the sauce pan to create a crown, pushing down and shaping as I went.

You can see a form of the crown taking shape but it wasn't as sharp as I was hoping for, so after trying this for 15 minutes I decided to try something else.  I'm an impatient costumer so if I don't get immediate results I sometimes move on to another project. But I decided to stick with it. 


Next I got the lid from my button jar, it's one of those jars you find at Marshalls or Home Goods that any number of people have on their kitchen counter. The one I have looks a little like this but slightly larger.
It's about six inches in diameter and shallow, just what I needed. 

I placed it on my ironing board and centered the place mat over it. I then pinned it in place to keep the brim flat and tied 1/4" elastic around the area I wanted for the crown. Side note: pin the elastic in place, it won't stay on its own and you will just grow frustrated. I tried a rubber-band first but only succeeded in shooting myself in the forehead, so save yourself the trouble and pin down the elastic.

 Here it's shown on the black place mat I did later, I accidentally deleted the photo of the elastic on the red place mat. 

Next, using a spray bottle, I sprayed the place mat again with hot water. I heated my iron to the hottest steam setting and sprayed the crown area with spray starch.  I don't know if the starch makes a difference but I figured it couldn't hurt. 

Using the iron and a muslin press cloth I started steaming the straw over the lid to form the crown.  I used the press cloth to protect the sole plate on my iron in case the dye on the place mat wasn't set, the last thing I wanted was a dirty sole plate so better safe than sorry. 
I did this for about 30 minutes then used my hair dryer again to dry the straw as much as possible. Next came the hardest part, I walked away from it and let it sit for a few hours while I worked on another project, in another room, downstairs as far as possible from this.  I knew if I stayed in the room I would keep fussing with it so I walked away. 

When I returned the first thing I did was remove the elastic to see if the shape would hold. 
 So far so good! Finally I removed all the pins, another side note: as a precaution I used glass headed pins, because of the heat from the steam I didn't want to use the plastic headed pins for fear of the heads melting.
 And success!!! I can't wait to decorate this but that will have to wait for another time. 

The black hat turned out a little droopy but that's fine.  

Friday my youngest son, Bubba and I headed to Downtown LA to go to FIDM, my purpose was two-fold, one to see the Emmy costume exhibit before it closed the following day and the other was the $1.00 a yard fabric sale at the Scholarship Store.  Unfortunately only one part was successful, the store only had knits for sale and the woven fabrics were nothing I needed but that's just how it goes sometimes.  I did get a hat for my son, a neck tie, some lapel flower pins, and a couple of bow ties. The gallery on the other hand was a complete success and I took pictures of everything! Here are two of my favorites and you'll understand why finding the black and red place mats was fortuitous.

First, the Outlander costume designed by Terry Dresbach, an 18th century look based on Christian Dior's New Look, check out the hat.
 I tried to get a better photo but I'm short and the ceiling was black but you get the idea. 
I will definitely be making a copy of this in the future!

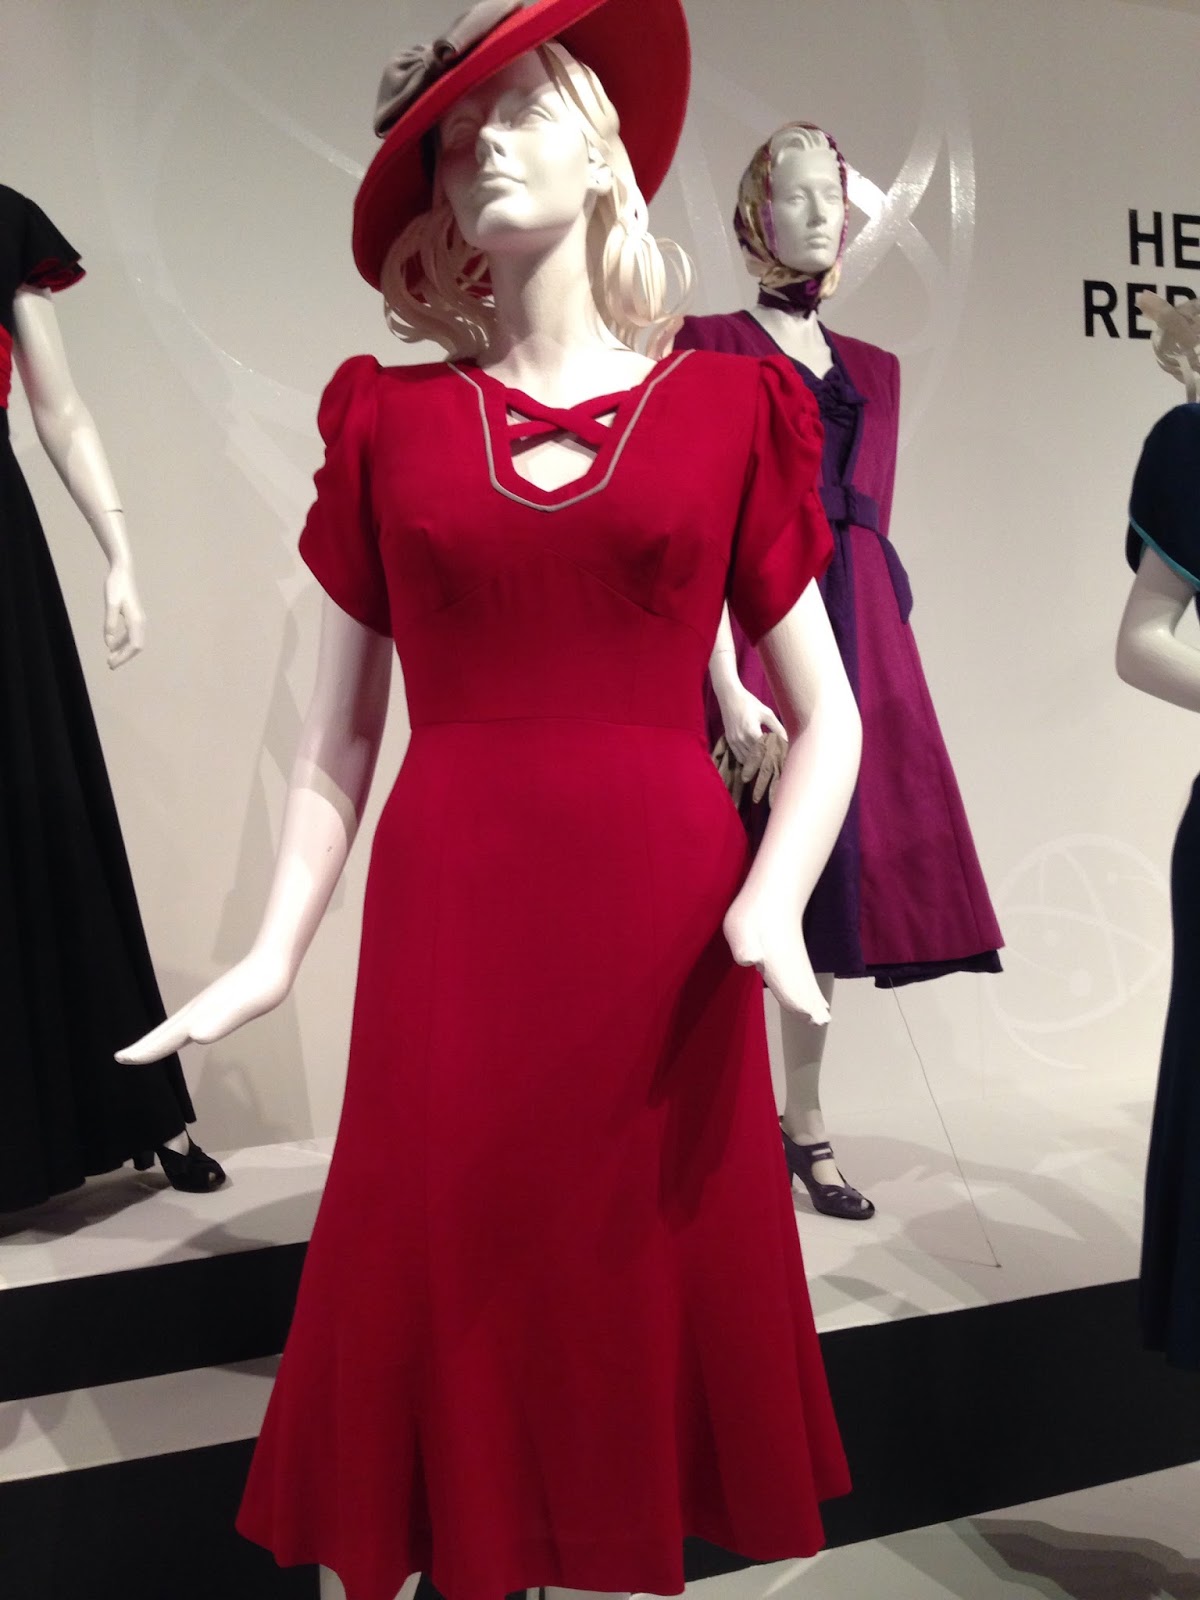
Then there was this gem, if you're a Marvel fan you'll recognize it.
Peggy Carter from Agent Carter, again I didn't get a great photo but look at the hat!!! It was a straw hat and the edge was trimmed with fabric that matched the dress. 
This one has a wider crown than the bergere I made but that can be easily done and I do have another place mat.  Proof that inspiration for fashion can be found in any century. 

Another project I did last week was something that meant a lot to a friend, she has 2 boys and I saw this and asked if she needed something like this for them. They are for seatbelts, if Heaven forbid, she is ever in an accident and is unresponsive, it helps rescue workers know why her boys aren't speaking. My husband gifted me with an embroidery machine last year and I love putting it to use in this way. 

So that's the stuff I've been working on, hopefully in the future I will be more consistent posting things, I'm not trying to reach thousands with my blog but someday when I'm gone I hope my grandkids will see this, like it, and get to know me through it. 
Terri 


Thursday, April 10, 2014

Easy Tricorn Hat Tutorial

A few years ago I decided to go with a different look for the Renaissance Pleasure Faire. It was pirate weekend and I wanted something new.  The problem with costuming is that all the fun is in the planning and making, once you've worn it the costume becomes "this old thing" and you dread wearing it again.  This can be an expensive vice. But fun, don't forget the fun.  So I decided a sort of 1700's undressed style courtesan costume would be fun in pink. I think the story I came up with for this costume was, here's this courtesan whose wealthy gentleman friend asked her to accompany him on a trip to visit his plantation in the West Indies, early one morning as they approach their destination a ship is spotted off the horizon. Pirates! Our girl is only half dressed when the ship is boarded. Of course our pirate captain looks like Tom Mison so she's not that heartbroken over her patron's death defending the ship. But I digress, so If I am going to go historically inaccurate to the Renaissance Faire I am going all the way.  I found this amazing pink fabric in the LA garment district and was off and running from there.

The fabric on the left was the first one I found and the fabric on the right was the best I could find to match it. I believe the whole thing ran me $30.00! I love reasonably priced fabrics.  Originally I had made another corset but unfortunately after I had finished it I realized it was too big!  This was due to my error in using a pattern from one of the big 3 pattern companies.  Be warned, Simplicity, McCalls, and Butterick add ease to their historical costumes and if you are making a corset you have to remove it.  With a corset you use what is called "negative ease" it's smaller than you are.  Here's the original corset:


It was reversible and I wasn't happy about the pattern not matching up.  

So much wiser I made another, out of the pretty princess fabric above and changed the entire look that I had envisioned. I know, I know! Get to the tutorial. 

Items needed
Small straw hat
Fabric ( I used scraps)
Trim
Scissors
Glue gun
Curved needle
Upholstery thread
Sewing machine
Wired ribbon (optional)
Jeweled button (optional) 
Felt or flannel

I started with a cheap ($ .99) mini straw hat from Michaels and some pink scraps left over from the front panel on my skirt. 

I cut 2 circles of fabric a half inch wider than the brim then I measured the crown and cut out a slightly smaller circle from the center of my fabric circles. I then sewed the outer edges of the circles together, clipped and turned them right side out and placed the hat within the circles. 

Next, I clipped the inner circle and measured the crown starting at the base across the top to the base and cut another circle to cover the crown. On the underside I also clipped the circle and glued the fabric to the inside of the crown. Then I covered it with a strip of felt glued in place. 

I used a gathering stitch around the edge of the fabric. Then I hot glued the gathered edge where the brim and crown meet. 

Next I used trim around the crown to hide the join, again using my trusty glue gun. I also added trim around the underside of the brim. 
Next I turned up the sides. To hold the brim I used a good bit of hot glue and held it in place until it dried. Then using a curved needle and upholstery thread I hand tacked the brim in place sewing thru all layers, including the straw. 
Repeat turning up the other 2 sides. In the picture above you can see where the trim overlaps, I planned to hide it using some kind of decoration. 

All three sides are done. Yay!  
^^These things happen. Ouch! ^^

Next, I embellished the hat using a 2 inch wide wired ribbon. I used a length that was about 12 inches long and  pulled the wire on one side only to gather it. Then rolled the ribbon until it resembled a flower. I tacked the bottom with thread then added the jeweled button to the center and sewed/glued it to the brim of the hat hiding where the trim was joined.


And the entire outfit: 


Excuse the messy garage, since creating this costume I've had 3 kids grow up and move out of the house so I actually have a spare bedroom and am now sewing in air conditioned comfort! In the future, I plan on making a new chemise for this costume and a proper bodice in case I ever go to Costume College. But seriously, never underestimate the power of a pink corset.
 Here I am at the Faire: 

And since I'm me and I like my costumes with a bit of whimsy, I purchased these socks: 
                                      

I should mention I did the shoes too. I have a photo tutorial just sitting on my computer waiting to be uploaded. 

The cool thing about costuming and being a bit of a pack-rat is this, when Halloween comes along and I've last minute costumed the entire family and haven't made myself anything I can pull pieces together and outfit myself fairly quick. I did this in about 2 hours the night  of our church Halloween party "Trunk or Treat" 
I used the pink corset and chemise. I made a pink sparkly elastic waist skirt out if tulle, the wand was a ribbon wrapped dowel and the star and tooth were made from sparkly craft foam. I also purchased a gold glitter headband and added another tooth to it. The wings I purchased at Disneyland, I mean really, who could resist light up Tinkerbell wings!?! Not me!

Two things before I go, first sorry for the poor picture quality, most of these photos were taken with my old chocolate phone. Second, if you are like me and are done having children and you have a large personal space bubble, DON'T wear a sparkly pink skirt to a church function. I lost track of how many times I felt someone's little chocolate hands patting my skirt and saying "oooo pretty"! That was the last year I dressed pretty. Since then it's been mostly a "zombie" something. 
Cheers, 
Terri


Sunday, March 6, 2011

Wow, it feels good to take off my shoes...

Yesterday I mentioned that I was headed to LA to check out the costumes at FIDM and to find some fabric for a future Renaissance Faire costume both goals were accomplished.  It was an absolutely gorgeous day, the weather was perfect as you can tell from this photo of the Eastern Building on Ninth Street.  The Eastern was recently converted into lofts, pricey and in the heart of downtown but I'm happy the old building is seeing some life again. 
 

The movie costumes were amazing, one of the things that always fascinates me is how tiny they are.  Ellen Page is super small!  I love the detail work that I saw in the Academy Award winning costumes from Alice in Wonderland.  I was hoping to see the costumes from Black Swan but no such luck.  They did however have on display the costumes from Clash of the Titans, Inception, Burlesque, King's Speech and Last Airbender which I'm told were much better than the movie itself.

After the Costume Gallery we headed over to the FIDM Scholarship Store, I scored 3 yards of black and white polka dot fabric for $3.00! I will add it to my stash and use it when I think of something to do with it.  While in the store Cheryl, Lacey and I found some vintage-y looking brooches and rings we plan on making a brooch/silk flower bouquet. If you haven't seen these you must check them out, try  here  These things are super gorgeous.  We wandered down the street from FIDM to the garment district and found ribbon, more jewelry and diet coke.  We met up with Lacey's fiance, his dad and brother to outfit them with new suits.  I like the idea of purchasing a suit that can be worn again instead of renting a tux, considering the deals on suits from my man Tebbi at Sina Suits how can you go wrong?  He even has a tailor on site that will do the work in about an hour.

So after all the shopping we ended up at Phillipe's the Original for french dip sandwiches.  I am a second generation patron of this fine establishment.  They have been in business since 1908.  My dad loved the place and passed it on to me.  I have in turn passed this tradition on to my kids.  My hubby is also a second generation patron.  His dad grew up in LA and loves the place.  I know that LA has some great restaurants but given the opportunity, Phillipe's lunch counter is where I will end up.  I love every thing about the place, the ceiling fans, the sawdust on the floor, the lemonade, the candy counter, the long tables that guarantee you will sit by a total stranger who may be homeless and was able to pay $.09 for coffee or Francis Ford Coppola you never know, but most of all, the sandwiches with their special homemade mustard.  HEAVEN! 

Today we attended church.  Due to responsibilities my husband and I have for the last 2 Sundays I've had to stay in my Sunday wear.  I have different classifications for my shoes, some are wear anytime all day long like my favorite summer flip flops or my Uggs, some are every few days is fine but not everyday, some are 3 hour shoes (the length of time I am at church), some are 3 hour but I better be sitting down for 2 hours and others are what in the world was I thinking?!?  Last weeks shoes were 3 hour shoes ( I was in them for 8), today's were more the fine every few days but I believe I will be barefoot the rest of the day. I love Sunday afternoons, I usually try to get a nap in somewhere, I am a true believer in the siesta being of Mexican descent.  The other reason Sunday is awesome?  I get emails from my Missionary son.  He is 19 hours ahead of us so for him it's Monday.  He gets 1 day a week called P day (preparation) to write family, do laundry, go shopping or whatever he needs to do to get ready for the coming week.  Today he emailed me this:

I want you to know I've been thinking a lot about you. I had a conversation with Sister Mautz before she left about having children serving missions. She said that it was a little sad because she felt like she never really got her children back. I thought to myself that you'd never "get me back either" but that's only because you can't get back what you've never lost. 

I feel so blessed to have a son who is so willing to lose himself serving the Lord.  I'm grateful that our family is so close and we enjoy each other, are we perfect?  Definitely not!  But I am indeed grateful that my kids know where home is and that they love to be here.

This was a good weekend,
Terri