Last Wednesday I was on Pinterest and came across a pin that someone had posted using a place mat as a bergere hat for a 1700's costume. I have wanted one of these for ages and decided I would try it, but the link for the hat left me disappointed because to me it still looked like a place mat with flowers attached. The next morning I awoke with my crazy/awesome idea. I did a little bit of research on Pinterest looking at bergere hats also I headed over to this blog and studied the lovely photos and her explanations. The Dreamstress is a wonderfully talented costumer. My next trip was to Target where I purchased 4 round, woven place mats for $1.99 each.
So onto my crazy/awesome idea, I'll try to explain what I did.
Items used
Place Mats
Spray Starch
Old Towel
Hair Dryer
Small Saucepan
Lid from my Button Jar
Iron
1/4" Elastic
Straight pins


I found red and black at my local Target since this was an experiment I wasn't too fussed about color so I decided that black and red would be fun, I had no idea how appropriate these would be until Friday.
To start, I soaked the place mat in hot water, then draped it over the inverted saucepan. Using my hands and the hair dryer I shaped the place mat over the the sauce pan to create a crown, pushing down and shaping as I went.

You can see a form of the crown taking shape but it wasn't as sharp as I was hoping for, so after trying this for 15 minutes I decided to try something else. I'm an impatient costumer so if I don't get immediate results I sometimes move on to another project. But I decided to stick with it.

Next I got the lid from my button jar, it's one of those jars you find at Marshalls or Home Goods that any number of people have on their kitchen counter. The one I have looks a little like this but slightly larger.

It's about six inches in diameter and shallow, just what I needed.
I placed it on my ironing board and centered the place mat over it. I then pinned it in place to keep the brim flat and tied 1/4" elastic around the area I wanted for the crown. Side note: pin the elastic in place, it won't stay on its own and you will just grow frustrated. I tried a rubber-band first but only succeeded in shooting myself in the forehead, so save yourself the trouble and pin down the elastic.

Here it's shown on the black place mat I did later, I accidentally deleted the photo of the elastic on the red place mat.
Next, using a spray bottle, I sprayed the place mat again with hot water. I heated my iron to the hottest steam setting and sprayed the crown area with spray starch. I don't know if the starch makes a difference but I figured it couldn't hurt.

Using the iron and a muslin press cloth I started steaming the straw over the lid to form the crown. I used the press cloth to protect the sole plate on my iron in case the dye on the place mat wasn't set, the last thing I wanted was a dirty sole plate so better safe than sorry.

I did this for about 30 minutes then used my hair dryer again to dry the straw as much as possible. Next came the hardest part, I walked away from it and let it sit for a few hours while I worked on another project, in another room, downstairs as far as possible from this. I knew if I stayed in the room I would keep fussing with it so I walked away.
When I returned the first thing I did was remove the elastic to see if the shape would hold.

So far so good! Finally I removed all the pins, another side note: as a precaution I used glass headed pins, because of the heat from the steam I didn't want to use the plastic headed pins for fear of the heads melting.

And success!!! I can't wait to decorate this but that will have to wait for another time.

The black hat turned out a little droopy but that's fine.
Friday my youngest son, Bubba and I headed to Downtown LA to go to FIDM, my purpose was two-fold, one to see the Emmy costume exhibit before it closed the following day and the other was the $1.00 a yard fabric sale at the Scholarship Store. Unfortunately only one part was successful, the store only had knits for sale and the woven fabrics were nothing I needed but that's just how it goes sometimes. I did get a hat for my son, a neck tie, some lapel flower pins, and a couple of bow ties. The gallery on the other hand was a complete success and I took pictures of everything! Here are two of my favorites and you'll understand why finding the black and red place mats was fortuitous.
First, the Outlander costume designed by Terry Dresbach, an 18th century look based on Christian Dior's New Look, check out the hat.

I tried to get a better photo but I'm short and the ceiling was black but you get the idea.

I will definitely be making a copy of this in the future!
Then there was this gem, if you're a Marvel fan you'll recognize it.
Peggy Carter from Agent Carter, again I didn't get a great photo but look at the hat!!! It was a straw hat and the edge was trimmed with fabric that matched the dress.
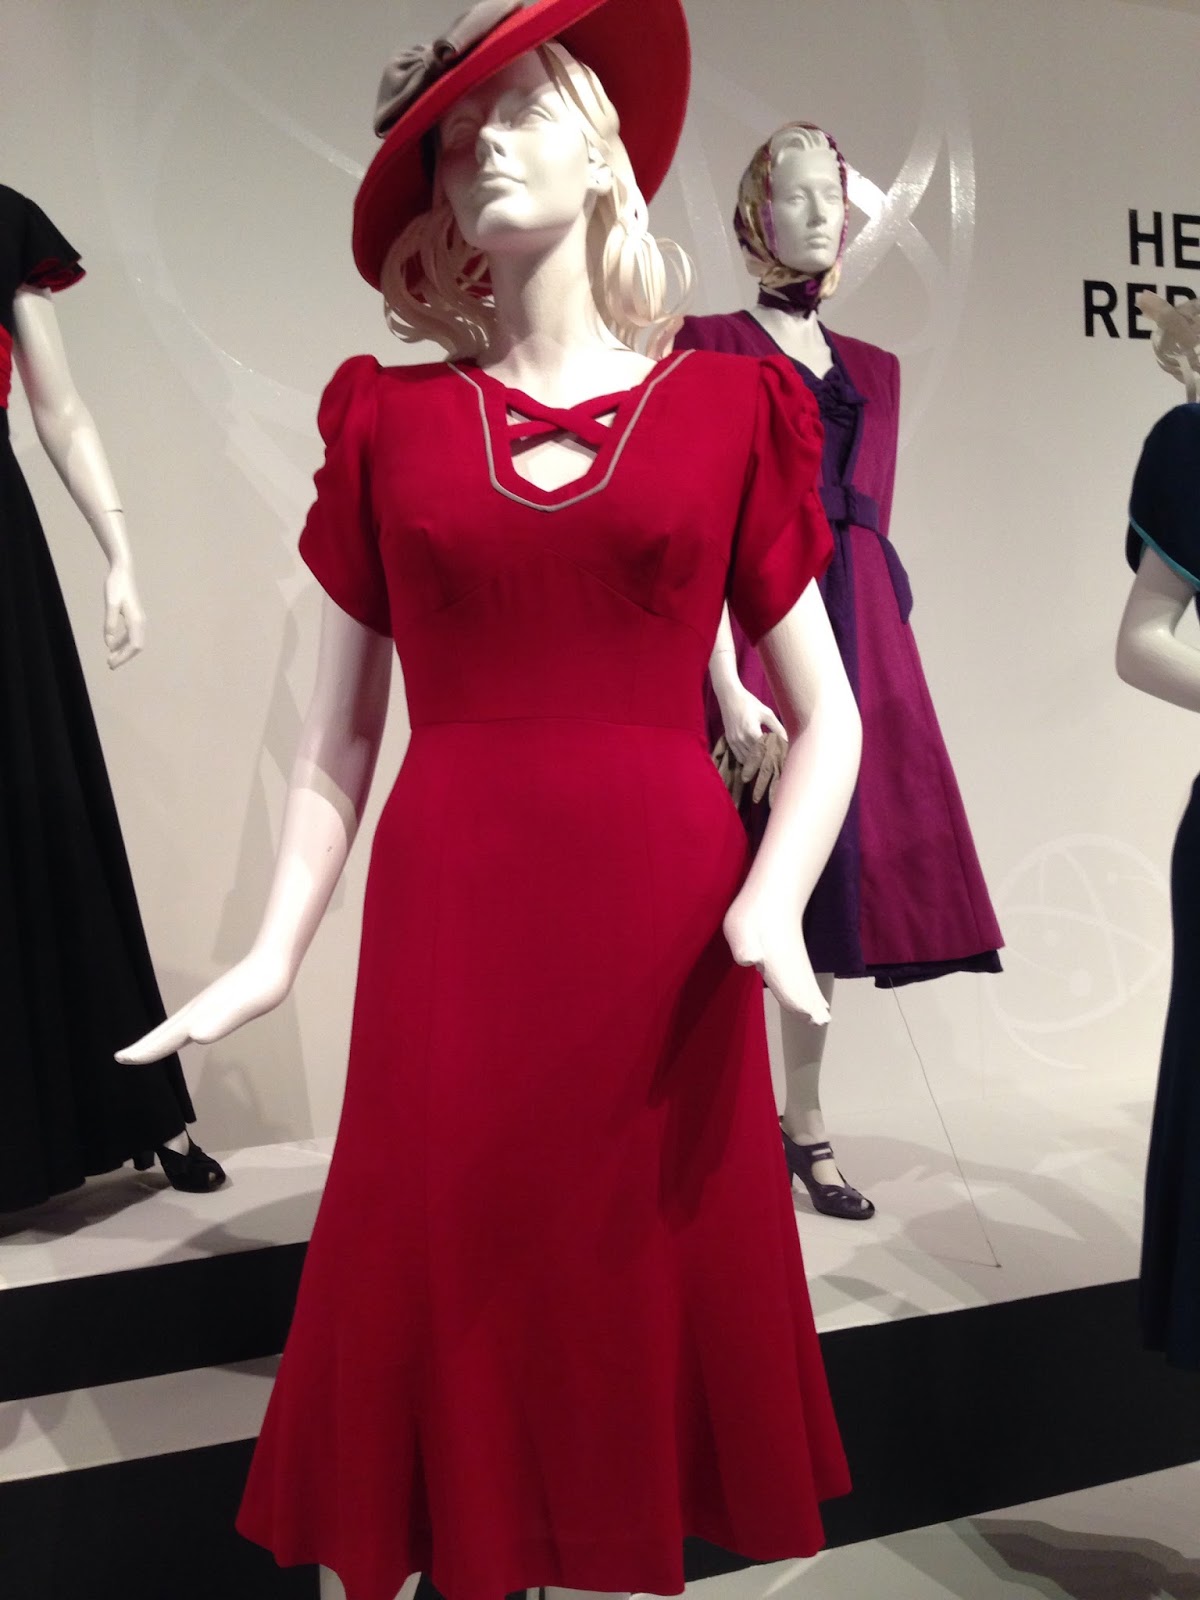
This one has a wider crown than the bergere I made but that can be easily done and I do have another place mat. Proof that inspiration for fashion can be found in any century.
Another project I did last week was something that meant a lot to a friend, she has 2 boys and I saw this and asked if she needed something like this for them. They are for seatbelts, if Heaven forbid, she is ever in an accident and is unresponsive, it helps rescue workers know why her boys aren't speaking. My husband gifted me with an embroidery machine last year and I love putting it to use in this way.

So that's the stuff I've been working on, hopefully in the future I will be more consistent posting things, I'm not trying to reach thousands with my blog but someday when I'm gone I hope my grandkids will see this, like it, and get to know me through it.
Terri
Thank you for sharing this! I'll have to give it a try. I am also members of the Church of Jesus Christ and an avid 18th century clothing enthusiast. I'd love to connect! Are you on IG? You can find me there @thecommunitywisewoman
ReplyDeleteI just saw your comment! I'm on Instagram as tmoore_vintagesewcialist I'd love to connect!
Delete